
This week I want to share with you sticky buns.
You have to understand why these are a triumph for me – I didn’t want to touch making them at first. I will admit that it is typically very hard to make gluten free and vegan breads, but these turned out to be a fun triumph that was not as hard as was thought.
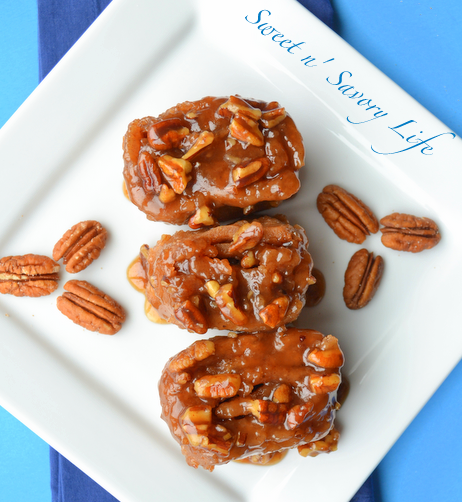
So we have… beautiful, sticky, moist, delicious, sticky buns…
You can taste it through the picture, huh?These sticky buns are so perfect when they are warm – fresh out of the oven. They are soft, and rich, accented by a lovely mingling of cinnamon, and homemade vegan caramel sauce that is just heavenly. You will love these, as did my husband and I. Did I not mention, that they are 100% vegan and gluten free. Exciting, isn’t it?
Ingredients:
Dough
3/4 c Bob’s Red Mill (BRM) white rice flour
1/2 c BRM brown rice flour
1 cup BRM Potato starch
3/4 c BRM tapioca starch
2 1/2 tsp guar gum
1 tbsp ground cinnamon
1/2 tsp sea salt
1 tbsp active dry yeast + 1/2 cain tbsp sugar + 1/4 c warm water (allow to sit for 10 minutes)
3/4 c warm dairy-free milk + 1 tsp apple cider vinegar
1/4 c + 1 1/2 tbsp brown sugar
1/3 c shortening, melted
1/4 c vegan butter, melted (I use Earth Balance)
1/4 c + 2 tbsp vanilla dairy free yogurt
1 tsp pure vanilla extract
Filling
1/4 c + 2 tbsp cane sugar (or light or dark brown sugar)
2 tbsp vegan butter, melted
2 tsp ground cinnamon
Caramel Pecan Glaze
3/4 c vegan butter
1/2 c cane sugar
1/2 c brown sugar
1/4 c dairy-free milk + 1 tsp cornstarch (to replace heavy cream)
2 tbsp pure maple syrup
1/2 tsp pure vanilla extract
1/2 c pecan pieces
Yields 12 serving sized sticky buns, but you can do 6 to 8 big ones.
About 250 calories in each…for those curious…
Directions:
Bakers note: If you do better with visual instructions, please click here, and you will be taken to a video that shows you perfectly what to do! No, the sticky buns being made in the video are not gluten free or vegan, but the instructions to follow are similar. Laura Vitale does a great job showing you the technique behind making these. We don’t want any mess ups now!
In a small bowl, mix the yeast, sugar, and warm water together. It should become frothy after 10 minutes of sitting, so allow it to stand for 10 minutes, while you prep the dough.
Next, mix all of the flours together including guar gum, cinnamon, and salt in a large glass mixing bowl.
In 2-cup pyrex measuring cup, melt your shortening, and butter in the microwave. Then add brown sugar, yogurt, vanilla extract and dairy free milk+acv mixture. Microwave all of this for about 30 seconds to get some warmth to all of these liquids.
Add your liquids, to your flour mix, and now stir, and then gently work into a dough with your fingers. This dough you have formed should be tacky (slightly adhesive or gummy to the touch) – not very wet and sticky, or dry.
Once you have created your dough, place it in the glass bowl, and cover it with saran wrap for 2 hours to sit and rise. It will not rise very high, but it will have notable rise if your yeast is good, and you have followed all directions.
After two hours, spread baking parchment paper out on your counter, and sprinkle it with some gluten free flour…any flour, very well.
Remove the dough (that has now risen some), and place it on the parchment paper. Start flattening it down into a rectangular shape with your fingers, then roll it out, with a rolling pin to make it an even rectangular shape (It should be longer than it is wide.)
Now, make your quick filling, and place it on top of the now flattened, rectangular shaped dough. Starting with your melted butter, drizzle it, and evenly spread. Then add your cinnamon sugar mix.
Once you have placed all of the filling on top, start rolling the dough length wise (into a long log shape), using the parchment paper as a rolling guide to avoid tears. It may be easier with the help of a friend! Roll it carefully, yet consistently.
Once it is completely rolled, begin cutting out the buns, and set them aside gently (I have found that with gluten free, things must be done gently – they are fragile).
Next, place the cut out sticky buns (that are not so sticky yet), in the refrigerator, while you make the caramel sauce. (You can do this step, and store overnight to complete in the morning, or you can complete the process in one night… your choice.)
After the caramel sauce is complete, preheat your oven to 350 degrees f.
Once your oven has heated, pour the caramel sauce into a clear pyrex pie dish, then start positioning the sticky buns in the pan strategically so that they press against each other. I say strategically because it does take strategy.
When you have got all of the sticky buns in, bake for 30 to 35 minutes, and then remove from oven. Allow to stand for about 15 minutes or so, and then flip them out carefully right side up.
Delicioso!